 |
|
|
|
 01-27-2012, 11:38 AM
|
#1 |
|
Dear Lord, Thank You.


|
I took pics of a few humidor fixes. I thought it'd make easy for guys trying to iron out leaks. I'm currently working on a couple of my display humis that would serve better as a colander than a humidor.
At any rate, here we go... Here's the humi... 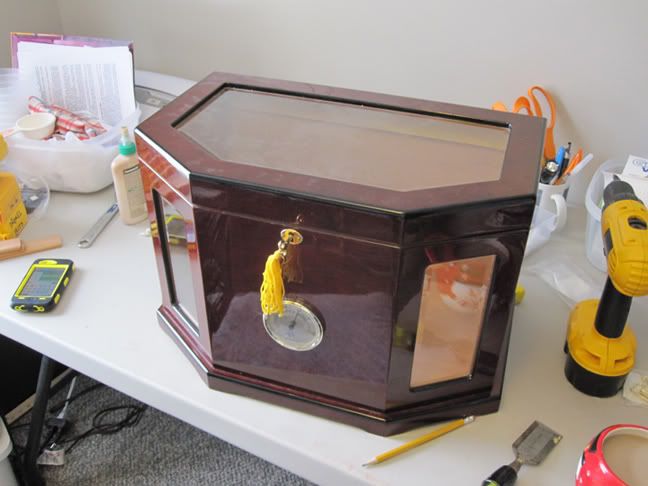 Here's how you take off the hold-downs... 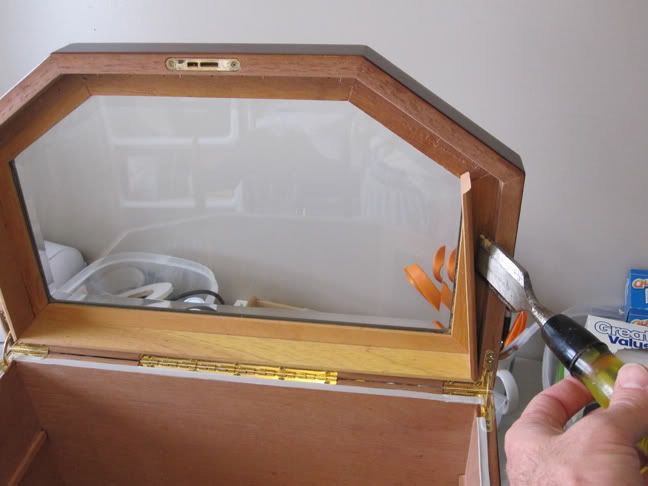 Here's how you avomark up the hold downs so you can get them back in the same place. I mark the back side so that I don't have to sand or erase anything.  Here's how you avoid smashing the glass while you try to remove the glass hold downs. Notice the lever principle. Sometimes these slats are glued down poorly. The key is patience, as the glass will break very easily. It's very difficult to keep from prying on the glass. It'd be so much easier. If you do, you'll definately be shopping a piece of glass to replace it. The whole trick here is to get the glass out WITHOUT breaking it. 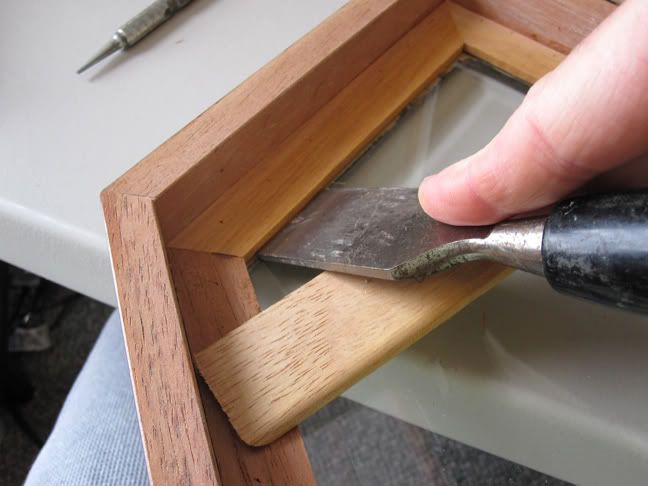 Glass is out, and it ain't broke. Yee haw!!! 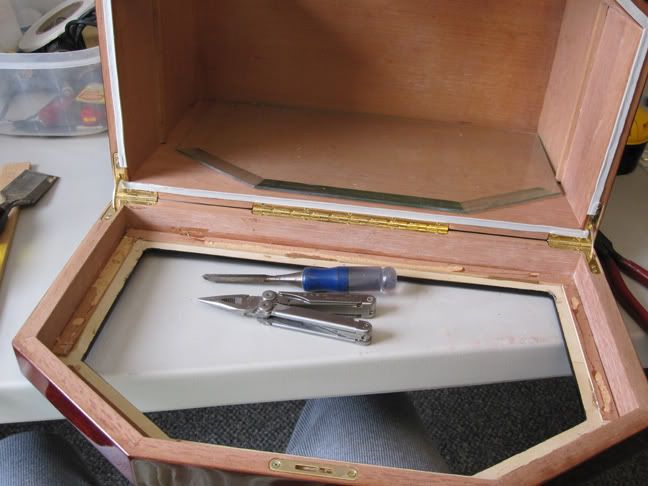 to be continued...
__________________

|

|

|
|
01-27-2012, 11:40 AM
|
#2 |
|
Dear Lord, Thank You.
|
Moving on, it's time to set the glass back in. I use 100% silicone in squeeze tubes for this kind of stuff. It's easier than fighting with a caulking gun. I use LOTS of silicone. It makes no sense to skimp after all this trouble. Notice how the silicone squishes out on the topside. That's awesome. I leave that to dry, I don't wipe it off. I'll cut it with a razor later.
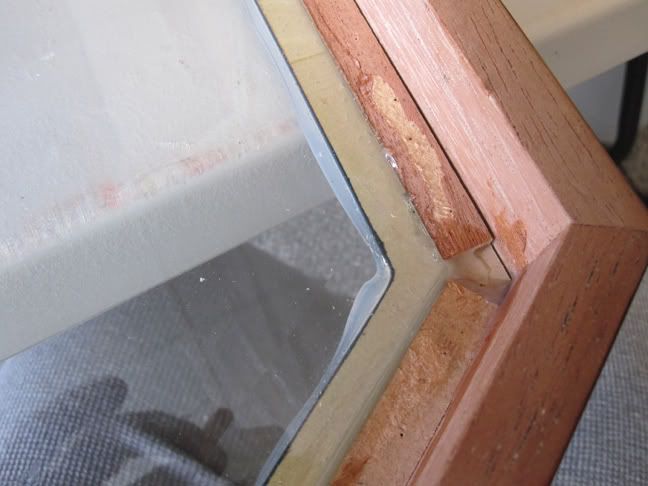 Here's a shot of the glass set in the silicone. Notice how it squishes out all around. That's what I'm looking for. It'll ensure there are no leaks.  Now I've glued the backs of the hold downs. I didn't do anything with the glass hold downs. I did that on purpose in case they ever need to be removed again. The other trim peieces will hold them in place perfectly. I use a good water based wood glue, and I use tons. It makes a mess, but fills seams. I clean up as I go. The clamps are indispensible. They're expensive, too. A guy could do this with just a few, but you'd have to wait between pieces and it becomes a struggle. That's why I have about a hundred pounds of clamps. I use them for everything I do. 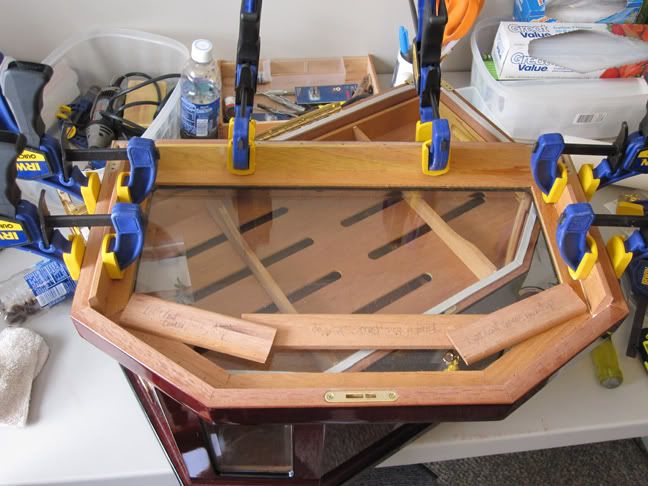 All clamped, now she'll just dry overnight. 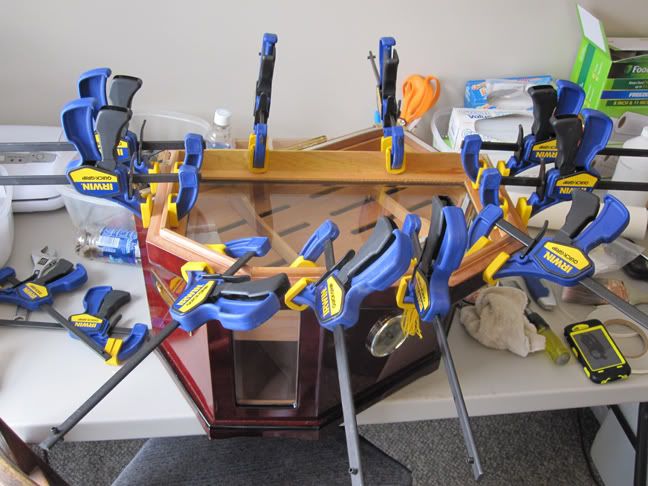 Next will be the weather stripping seal and testing. 
__________________
|
|
|
|
|
01-27-2012, 11:42 AM
|
#3 |
|
Dear Lord, Thank You.
|
I should note that somewhere along the way I took the lid off.
I left it on initially because I was using the weight of the humidor as an extra hand. When the base started getting in my way, it was time for the lid to come off. In most cases, the screws are already falling out on their own. The humidors are particle board with laminated wood on the inner side and outer side. It is super thin. The mdf board isn't very tough, either. If you cross into the land of falling out screws, just take notice for now. When you put the lid back on, all you do to tighten the holes up is to jam toothpicks in them and break them off. The piece of toothpick in the hole will tighten it nicely and stop the screws from pulling/falling out. Okay, it's just weatherstripping. I'll just lay up some pics, cause it ain't rocket surgery. The main thing is the type of weather stripping. Closed cell stripping rocks because it's like memory foam, and after it's compressed it will return to it's original shape. I use different sizes, I believe the brand is Weather King. I get it at Lowe's or True Value. It comes in three colors, brown, gray and white. I use gray and brown. Laying it out in the corners. I work around the hinges, sometimes I remove them, all depends on what the humi is like. 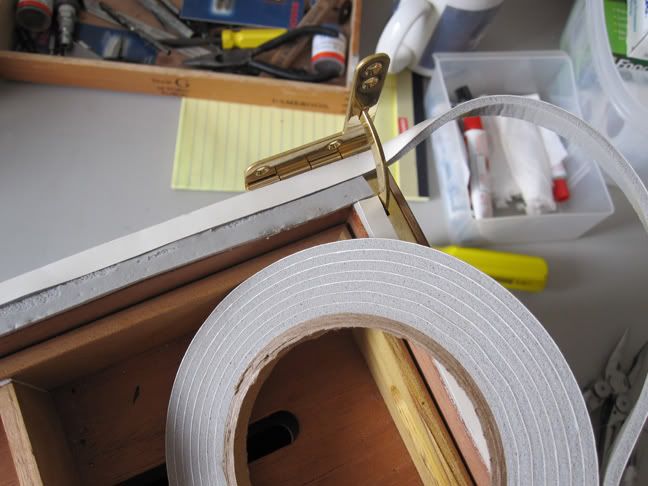 I try to stagger the ends of the weather stripping when I double it up. I don't think it really makes a difference, but it's more aesthetically pleasing, and it mashes together nicely when the humi is closed. It seems to go a long way toward getting a 100% seal. The knife is an xacto knife. I have one on every desk, I use them more than any tool I own. I don't think a day goes by when I don't use one. 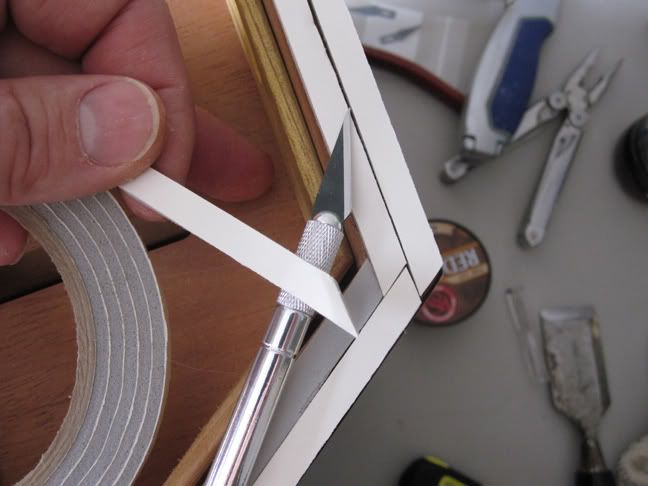 And now on to water testing...
__________________
|
|
|
|
|
01-27-2012, 11:44 AM
|
#4 |
|
Dear Lord, Thank You.
|
I filled up the base with water first. I used plain old tap water. Once I found there were no leaks whatsoever, I rinsed the old girl out with RO water. I have a Zero TDS unit under my sink because I need distilled water for my marine tank, and needed it to make beads. I get a lot of use out of it, so it made it very worthwhile.
Someone will ask, "Won't the water ruin the humidor?" or "Shouldn't you use distilled water for everything?" The best I can answer is no and no. It's just cheap wood. Water won't hurt any wood, so long as it's preconditioned. In the shop I use a spray bottle with distilled water to wet my wood, that way it won't stain. Then I can use all the regular water I want and it won't leave a mark. A guy just has to think a bit, ya know? If you use dirty water when the wood is dry, the wood will suck in the dirt. Use clean water first, then the wood can't suck dirt cause it's already wet. Not a single drop leaked from the base, despite some large seams and lots of patching. 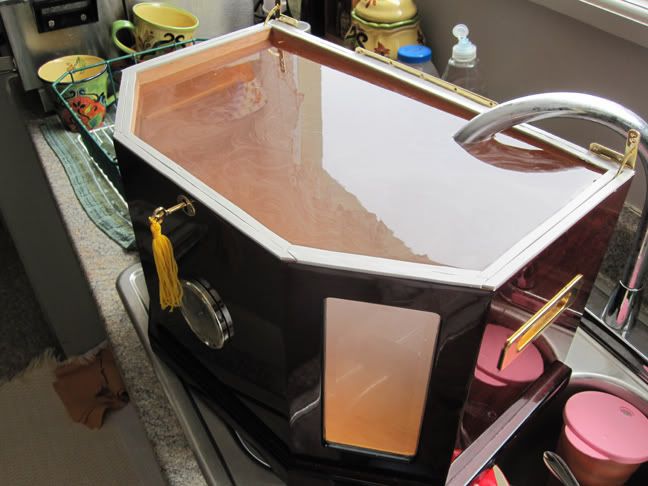 I only half filled the unit once the top was on. I didn't want the weight of the water to cause me to break the glass. With the humi 1/4 full, I turned it up on all sides to check for leaks. Nothing. It's 100% leak-free. 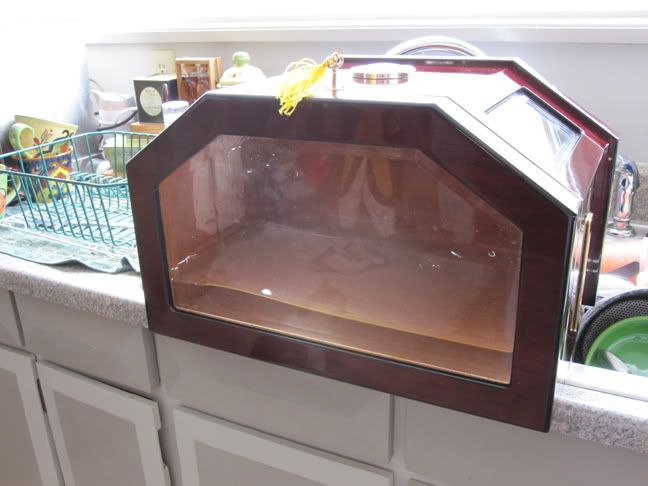 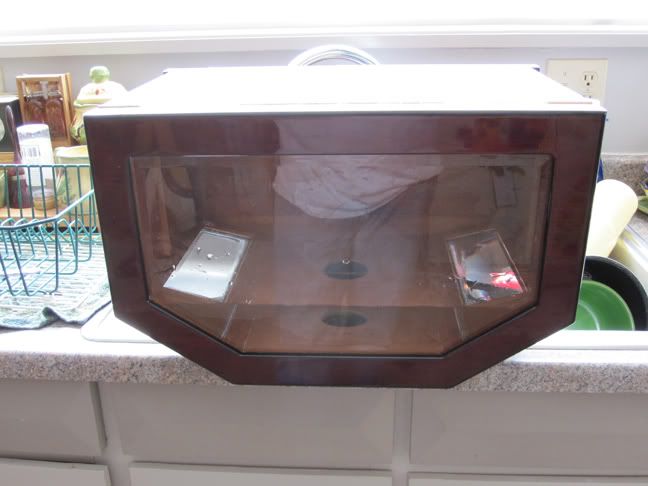 All emptied out and ready to get dried. 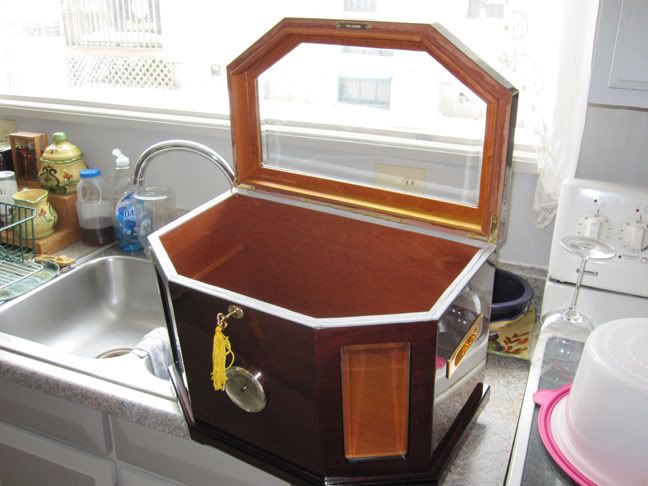 Sitting in front of the barrel fan to dry so it doesn't warp. I should mention here that the water should only be in the humi for a very short time. Otherwise it will warp. I should also mention that I taped off the holes in the hygrometer, and I had sealed it with silicone a long time ago. I also sealed the handles, they were really bad. The light in this last pic looks really blue. It's from the lights in the kid's lizard tank. I'm too lazy to fix the pic. 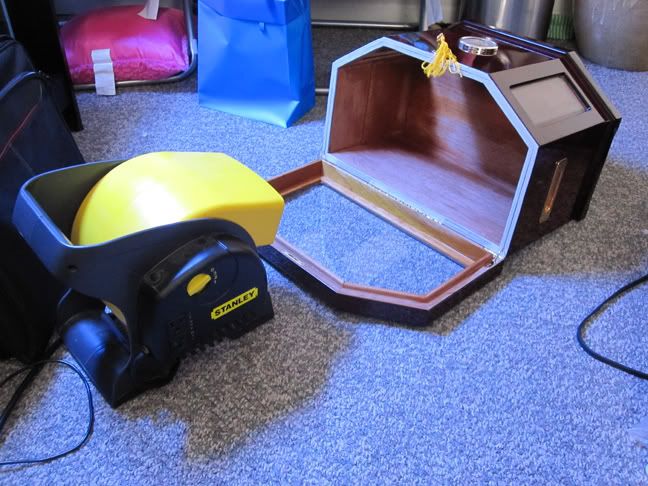 And the last of it all...
__________________
|
|
|
|
|
01-27-2012, 11:46 AM
|
#5 |
|
Dear Lord, Thank You.
|
These last pics were from when I reinstalled the lid. That happened after I tested the base for leaks, as I needed it together to test the top glass and the seal.
Clamp on the one side serves as a hand. I wish I had an extra arm growing out of my chest, but alas... 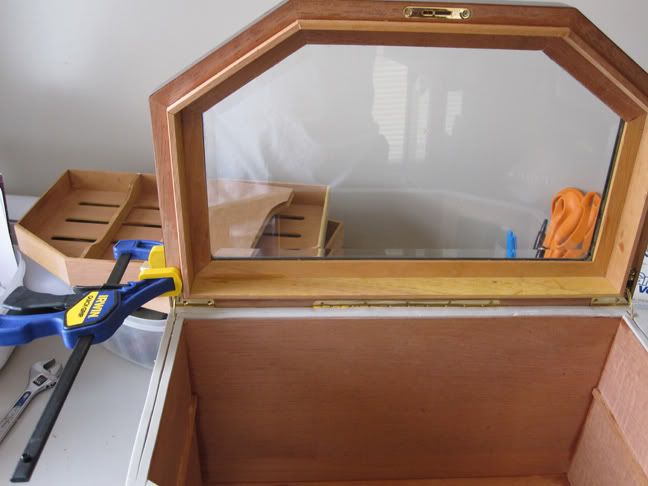 And a close-up 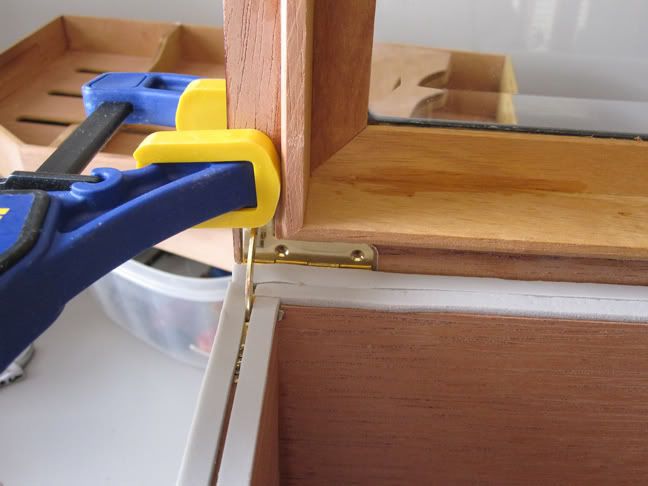 The finished fix. 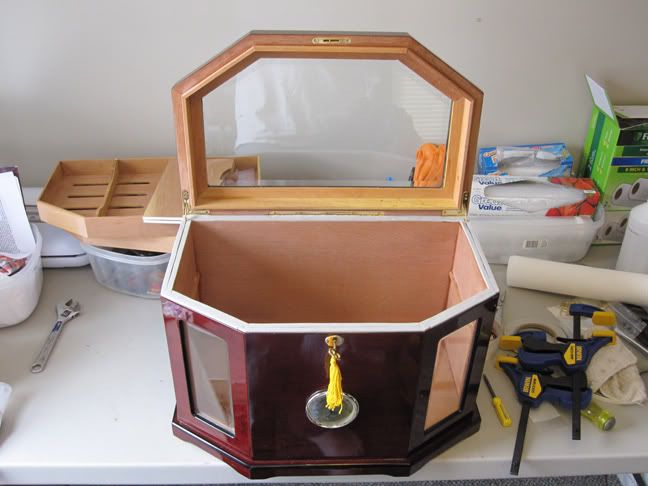 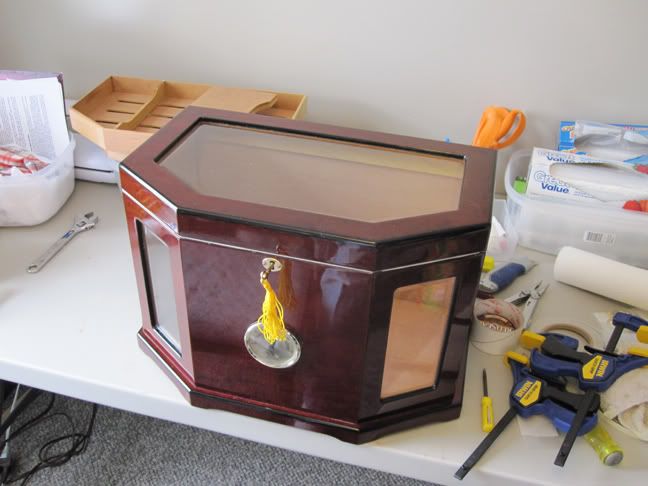 And some final thoughts...
__________________
|
|
|
|
|
01-27-2012, 11:51 AM
|
#6 |
|
Dear Lord, Thank You.
|
Lastly...
I enjoy fixing these humis. It's a pain in the butt, though. It takes a lot of time, tons of tools, and a good amout of materials. If I had to price out a humi fix, it'd be at least a hundred bucks with all the shipping involved, and all the time and materials. Reason I mention this is that normally a guy can find a well built handmade humi for a little more than what this one and a repair would cost. Keep that in mind when you're shopping. The water test is definitive. I've been hearing about the "woosh test" and "dollar bill" test for as long as I've been around the boards. It made no sense the first time I heard it, nor the last time. I can drill a half inch hole in a humidor lid and it'll woosh all day long. The dollar bill would be helpful if I crumpled it up and jammed it in the 1/2" hole I just drilled.  Now, conversely, if it's tough to open your humi and it sucks when you open it, that's a good seal. This thing is a pain to open now. That's what we're after. The flashlight test, not a bad idea. The only problem is that most humidors are made with a lip around the main seal that will hide the beam of light well enough to make it impossible to seal. The flashlight test would work AWESOME for a winador seal. There's another thought... You wouldn't think a winador seal would leak. They do. I've fixed two doors already and one of the brothers here just fixed his. The doors sometimes need adjusted so the door seal seats properly. All humidors rely on being set on a nice, hard, uniform, level surface. That's a big help in avoiding problems. Keeping them out of temperature extremes should be obvious, too. By a window or on top of a fridge is an awful place for a desktop. Okay, I'm done. I imagine I've pissed off the whole world for cutting on the woosh test. I mean no disrespect whatsoever. I could write a 100 page thesis on all the reasons it's not definitive, but I'm not all that interested. I just want you guys to be able to fix your humis when they're leaky, and the woosh test and dollar bill test aren't going to help. I will give the woosh test one credit though, if your humi doesn't woosh at all, you might have lost your lid, or the glass fell all the way out. I have pics of a couple more humi fixes, I'll try to do a Fixing a glass topped Humidor II and III, as well as a "Fixing a plain old humi" thread as time allows. I sure hope this helps!!!
__________________
|
|
|
|
|
01-27-2012, 12:05 PM
|
#8 |
|
Think Blue!

|
Great documentation Scott!
Great thread! Very well done, that is a ton of work! The only thing I have to mention is the white seal is visable when it is closed, do they make a black seal that would be less noticeable? Looks are not as important as seal obviously but that is a shart looking humi.
__________________
SUPPORT OUR TROOPS |
|
|
|
|
01-27-2012, 02:43 PM
|
#9 | |
|
Guest
Posts: n/a
|
Quote:
 You could probably hit the weatherstripping with wood stain to blend it in. |
|
|
|
|
01-27-2012, 02:44 PM
|
#10 | |
|
Think Blue!
|
Quote:
__________________
SUPPORT OUR TROOPS |
|
|
|
|
|
01-27-2012, 03:27 PM
|
#11 | |
|
Dear Lord, Thank You.
|
Quote:
The gasket material isn't white, it's gray. The white you see in the earlier pictures is the paper backing that you peel off. What you actually see in that pic that appears to be the seal is the crappy fit of the lid on the humi, coupled with the fact that the mating surfaces of the lid and the box are not the same color as the outside of the unit. They're like a fake light brown woodtone. Staining it would be akin to staining contact paper like you stick in drawers. It's not wood, it's laminate, just like all cheap humidors. A guy could probably use a brown Sharpie and color in those surfaces, but it'd look tacky as hell. They don't make a black seal, they make white, grey, and a light brown. The grey looked better than the brown on this thing, if you can believe that. You can only polish a dog turd so far, ya know? 
__________________
|
|
|
|
|
|
01-27-2012, 12:57 PM
|
#13 |
|
ZOTL's mmmmm brainssss


|
Awesome post Scott! I used the weather stripping on my cooler (which I got because my humi was both too small and leaked!) if I get another humi I will def come back to this post! STICKY!
__________________
 ZOTL our appetites will ALWAYS be bigger than your braaaiiiins... ZOTL our appetites will ALWAYS be bigger than your braaaiiiins...Support the Troop Support Contest 2014!!! |
|
|
|
|
01-27-2012, 02:13 PM
|
#16 |
|
Dear Lord, Thank You.
|
No idea what the humidor is. It belongs to a member here, Scott (sofaman). Stephen has the same one. His screen name is, craftily, Stephen.
Maybe one of those guys knows the model name? They're pretty, that's for sure.
__________________
|
|
|
|
|
01-28-2012, 12:44 PM
|
#17 | |
|
Gentlemen, you may smoke!

|
Quote:
|
|
|
|
|
|
02-02-2012, 10:52 AM
|
#18 | |
|
Dear Lord, Thank You.
|
Quote:
If you don't want to go to all the grief of tearing it apart, you could seal the glass from the outside. Just get a tube of good 100% silicone and some isopropyl alcohol. If you wet your fingers with the alcohol and put some in a little spray bottle and keep spraying the silicone as you work it into the cracks along the glass, the alcohol keeps the silicone from becoming the sticky, gooey, stringy mess that it is. When it dries, you can use a razor blade or exacto knife to make a nice incision along the glass, then peel away all the excess without bothering your glass seal. The hygrometer is easy to fix. Tape on back, fill hole, blob of goo, jam it back in. Make sure to look inside the handles, too. I was shocked when I found the back of one blown out. I still can't imagine how it'd ever happen. Point is, I did this the hard way. It can be done a lot easier. I just went through all the extra effort cause Scott really loved this humi and he wanted to keep it forever.
__________________
|
|
|
|
|
|
02-02-2012, 11:13 AM
|
#19 | ||
|
Sultan of Cigars

Join Date: Jan 2011
First Name: Stephen
Location: Where the Pony Express began and Jesse James ended.
Posts: 1,582
Trading: (18)
 |
Quote:
Quote:

|
||
|
|
|
|
01-27-2012, 02:43 PM
|
#20 |
|
member of the CA MINYAN

|
I have the same humidor as well. Leaks like crazy to the point where I put a Hydra unit in it to keep it stable. I think I bought mine at Tampa Humidors but I don't see it on their site anymore.
I put all my cigars in a cooler since the room I kept them in is now my son's room so that humi just sits in my basement empty now.
__________________
I think Pandora's box was actually a humidor! |
|
|
|


 Hybrid Mode
